


- Oct 12, 2018
- 6 min read

This post contains affiliate links. See disclosure.
I'm constantly trying to balance my urge to decorate with my desire to maintain a clutter-free, minimalist aesthetic.
For this reason, half-painted walls really speak to me.
Partially painting a wall is a simple, inexpensive way to make a statement in any room, without adding clutter.

Image via Craftifair.

Image via Sugar and Charm.

Image via Sugar and Charm.
In this week’s post, I’ll show you how I created my own little half-painted wall in our bedroom, which doubles as a faux headboard.
But First, Some Excuses...
If you've been following along for a while, you may have noticed that I've never shared any photos of our master bedroom before. (The photos in my Leesa mattress review were staged in our family room.)
The reason for this is that ... well ... our master bedroom kinda sucks. There's no getting around it. It’s tiny with an awkward layout and the walls are covered in yellow-painted-over wallpaper from the 60s. Believe-it-or-not, until now, we hadn’t changed a thing since we moved in, seven years ago. As far as home improvement goes, our bedroom’s the neglected red-headed (err...yellow-walled) stepchild of our home.
For some context, the third floor of our narrow, little semi is made up of two tiny bedrooms; the first became our 'master' bedroom and the second was repurposed into a makeshift walk-in closet (actual closet space in century-old Toronto homes is almost non-existent, so this was a necessity rather than a diva move, I promise!).

Our bedroom. Yes, that's a window AC unit with a tangle of wires and extension cords below (I'd moved the chest that used to obscure those to prep for painting). You know how I feel about wire clutter!

Our DIY walk-in closet: the second of our two, tiny, third floor rooms.
We'd planned to eventually remodel the two rooms on the third floor into a single loft space, maybe with a master bath and outdoor terrace (a girl can dream...). But, each year that goal seems to drift further away.
Each time we even think about this reno, other parts of the house catch wind and start to crumble or leak, like children clamouring for their parents' attention. (The leaky wheel gets the reno!)
Though a proper remodel is years away, I was inspired by our new mattress to give the room a revamp---but, nothing too fancy, since we'll end up demolishing this room ... eventually (maybe).
Next week on the blog, I’ll share our complete mini-revamp of the master bedroom. This week, though, I’ll give you a little teaser with our faux headboard DIY!
Why Not Just Get A Headboard?
As you may recall from my Leesa mattress review, we upgraded from a queen to a king-sized mattress. Why did we choose such a massive mattress for a tiny room??? Because Owen and Charlie (our sons, human and fur) often end up in our bed and we were waking up with feet and paws in our faces. Going from queen to king has been a real game changer!
To help our tiny room accommodate this massive bed, we searched high and low for a bed frame with a minimal footprint, and ended up with this one:

Wood Slat Platform Bedframe ($114.24, Amazon.com).

Here it is under our Leesa mattress (in the family room).
I’m not going to lie, the price was a major selling point! Though, the lack of headboard looked unpolished (to say the least) when we moved it up to our already meagre bedroom:

So, the question then became how do we get the look of a headboard without the bulk of a headboard?
The answer? By painting a faux headboard on the wall!
This is a particularly useful solution in this room, with its its uneven wall at the head of the bed (a remnant from when there was a working fireplace in this room).
Prepping the Wall
First things first! We needed to get rid of that horrid yellow wall. Some say yellow rooms can induce anxiety. Perfect for a bedroom!
The reason we never bothered painting this room in the first place was the 60s wallpaper under the paint. It didn't seem worth the time and effort to remove the wallpaper before repainting (since the plan is to eventually gut this room); it also seemed just wrong to continue to paint over wallpaper (kinda like sweeping dirt under a rug).
We had to get over the only-worth-doing-if-done-right mentality and accept that there's value in cheap and cheerful (and imperfect) improvements.
So, I piled more paint on top of that painted wallpaper!
I thought white would do best to make this dim, tiny space seem as big and bright as possible. I chose Behr Snowfall in matte, which is a nice, warm white. Matte paint is also more forgiving than glossier finishes when it comes to hiding uneven textures (like the wallpaper below).

Ah, much better! As you can see, the baseboards are still horrid. But, seeing as you won't see them when the bed's there, I'm filing this under 'screw it.' All part of the Hakuna Matata philopsophy for this room revamp.
Painting the Half-Wall/'Headboard'
I was inspired by this image from Lonny Mag, and decided to go with black paint for the bottom half of the wall.

Image via Lonny Mag.
Disclaimer: this 'DIY' doesn’t follow the typical, step-by-step format. That was the plan, but due to some false starts, this reads like more of a retrospective/what-not-to-do...
I looked up the average headboard height and traced a line across the wall at this height, using a level, tape measure, and pencil:

I outlined the area in frog tape and went to town with Blackout from Behr in matte.

Three coats later:


Unfortunately, it didn't turn out the way I'd hoped. The 'headboard' seemed too overpowering in this small, poorly-lit space. So, I decided to scale back the black area.

I played around with the image on my phone (this is a screen shot) to determine the height at which the headboard would look best, from a distance. I recommend doing this before you paint...

I replicated the image from my phone's photo editor with real paint on the wall.
This required four layers of white paint and an entire weekend to allow drying between layers.

But, something was still not quite right. It wasn’t just the size of the colour block that was overpowering, but the colour itself. The black-white contrast was too stark and it made the already-tiny space appear even more constrained.
I'd like to think I have a good eye. But, my mind’s eye sucks! I have to literally see things play out before I can decide whether they look good or not.
For me, rearranging furniture in our home is like a sport. My husband's always trying to guess at what's changed.
If At First (Or Second) You Don't Succeed...
After the first couple of false starts, I wanted to get this mofo right. So, I turned to Pinterest and carefully researched what colour to use to paint over the black. In the process, I started a new Pinterest board on half-painted walls).
I found this image and was smitten. I had to have the paint on this half-painted wall:

Image via Avenue Lifestyle.
Turns out, they used Light Blue by Farrow & Ball. So much for keeping this budget-friendly!!! (At this point, the faux headboard costs more than the bed frame). Despite its name, it's more of a silvery blue-green.

Image via Modern Country Style. I also found this shot of the paint used in a bedroom with similar lighting to our room. Isn't it pretty?


Here we go again...

Forgive the lighting. It was evening by the time the white paint covering up the previous misstep, above, was dry enough to tape over.

Four coats and a day later:


So, what do you think? Not bad, considering the before, right?


In this corner, the paint looks darker than I'd anticipated, but I like it! And, even if I didn't, wild horses couldn't drag me to paint this wall again!
You know that expression 'like watching paint dry'? Well, from now on, I'll associate waiting for paint to dry not with boredom, but with impatient anticipation and regret for not doing things right the first time!

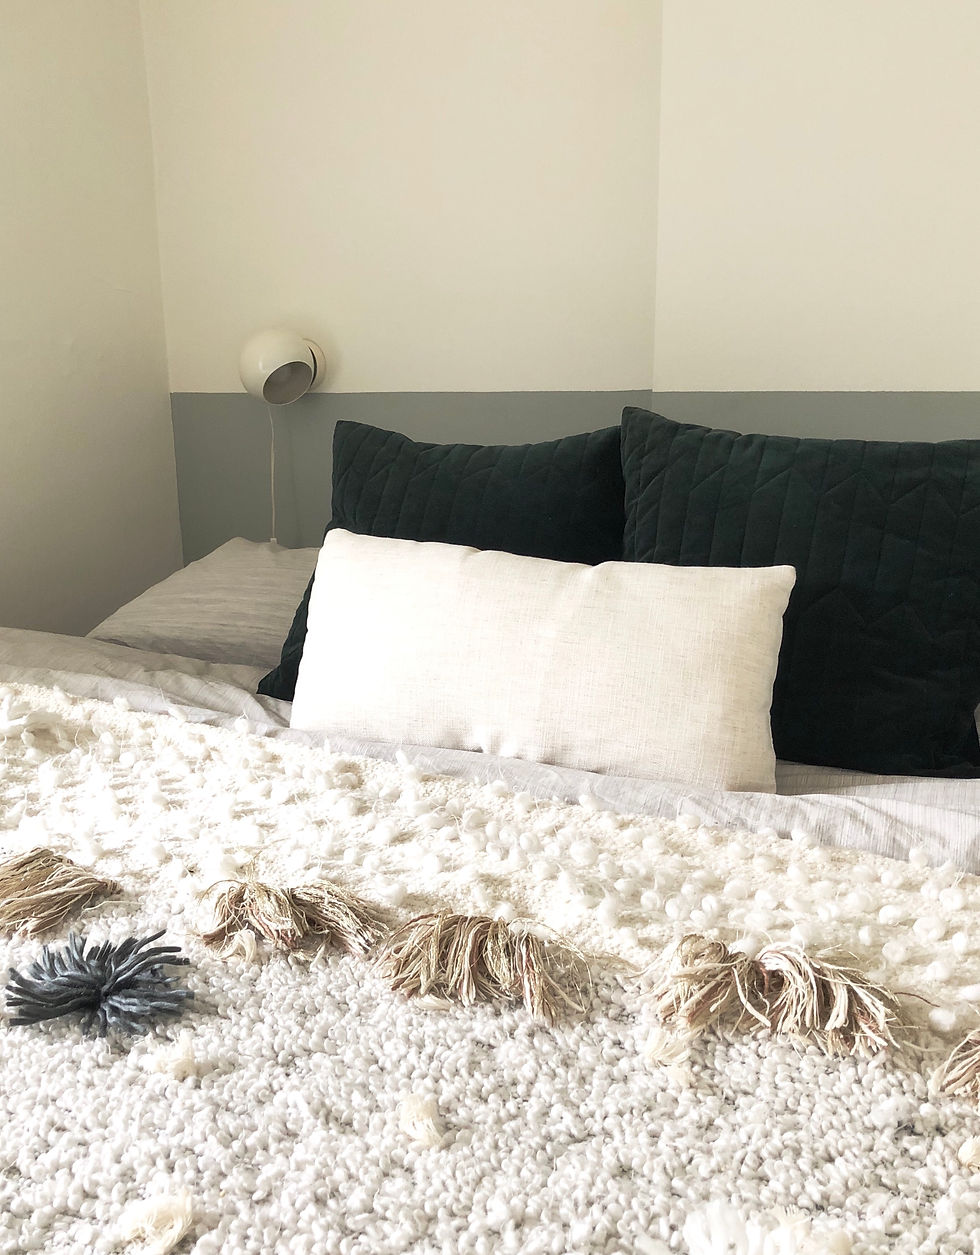
Sources: Green velvet pillow covers (H&M Home); lumbar pillow from IKEA Soderhamn Sofa (covered in Comfort Works linen cover); sheet set (IKEA); throw blanket (Anthropologie); sconce (vintage, Studio Pazo).
I think I'll eventually put a print or two above the bed. But, for now, I’m kind of liking the calm, zen feel of the bare wall. It’s a bedroom, after all!
Hindsight Takeaways
1) When determining the height of your half wall: take a photo and use the photo editor on your phone to determine the ideal half wall height from a distance. Ideally, do this before painting...
2) When choosing your paint colour: factor in lighting and the size of the space. It helps to view online images of the paint in different lighting (or you can be extra cautious and test out paint swatches on the wall in question).
Hope you enjoyed this quick, easy (but, longer-and-harder-than-it-should-have-been) DIY!
Tune in next week for the full bedroom revamp!
Please subscribe to be notified of each new post.

You May Also Enjoy


If you enjoyed this post, please share with a friend!

Really helpful post! One thing I was curious about do you have any advice for Rush Order Services? Would love to hear your thoughts.
The topic “Minimum Tattoo Age in Las Vegas – How Old Do I Have To Be?” is very informative and helpful, especially for first-time tattoo seekers. It clearly explains legal age requirements, parental consent rules, and state regulations, making it easier to avoid legal issues. Understanding these guidelines helps people make responsible decisions before getting a tattoo. Just like tattoos require precision, hygiene, and professional standards, USA embroidery digitizing also follows strict quality guidelines to ensure clean, accurate, and long-lasting designs. Both fields value skill, compliance, and attention to detail to deliver safe, professional, and high-quality results for clients.
I found matlab assignment help useful while practicing MATLAB problems, especially for understanding logic errors and improving my coding approach.
ayamtoto | ayamtoto | ayamtoto | ayamtoto | ayamtoto | ayamtoto | ayamtoto | ayamtoto | ayamtoto | ayamtoto | ayamtoto | ayamtoto | ayamtoto | ayamtoto | ayamtoto |
toto slot | toto slot | toto slot | toto slot | toto slot | toto slot | toto slot | toto slot | toto slot | toto slot | toto slot | toto slot | toto slot | toto slot |
toto togel | toto togel | toto togel | toto togel | toto togel | toto togel | toto togel | toto togel | toto togel | toto togel | toto togel | toto togel | toto togel |
ayamtoto | ayamtoto | ayamtoto | ayamtoto | ayamtoto | ayamtoto | ayamtoto | ayamtoto | ayamtoto | ayamtoto | ayamtoto | ayamtoto | ayamtoto |
toto slot | toto slot | toto slot | toto slot | toto slot | toto slot | toto slot | toto slot | toto slot | toto slot | toto slot | toto slot | toto slot | toto slot | toto slot | toto slot |
toto togel | toto togel | toto togel |…
Experience passion like never before with real sex game adventures. Interactive, immersive, and exciting, these games bring fantasies to life with realistic scenarios and gameplay. Explore desires safely and enjoy thrilling adult entertainment with real sex game experiences designed to keep excitement alive.