


- May 4, 2018
- 4 min read

This post contains affiliate links. See disclosure.
I've always loved Mid-Century Modern furniture. It's clean lines, functionality and quality materials translate into classic pieces that never go out of style and are oh-so-versatile! A touch of mid-century can elevate almost any room.
Our two largest pieces of MCM furniture are our walnut credenza (which we serves triple duty as a tv console, junk drawers and toy storage--see this post for more on that), and our teak dining set, both purchased at Guff in Toronto.

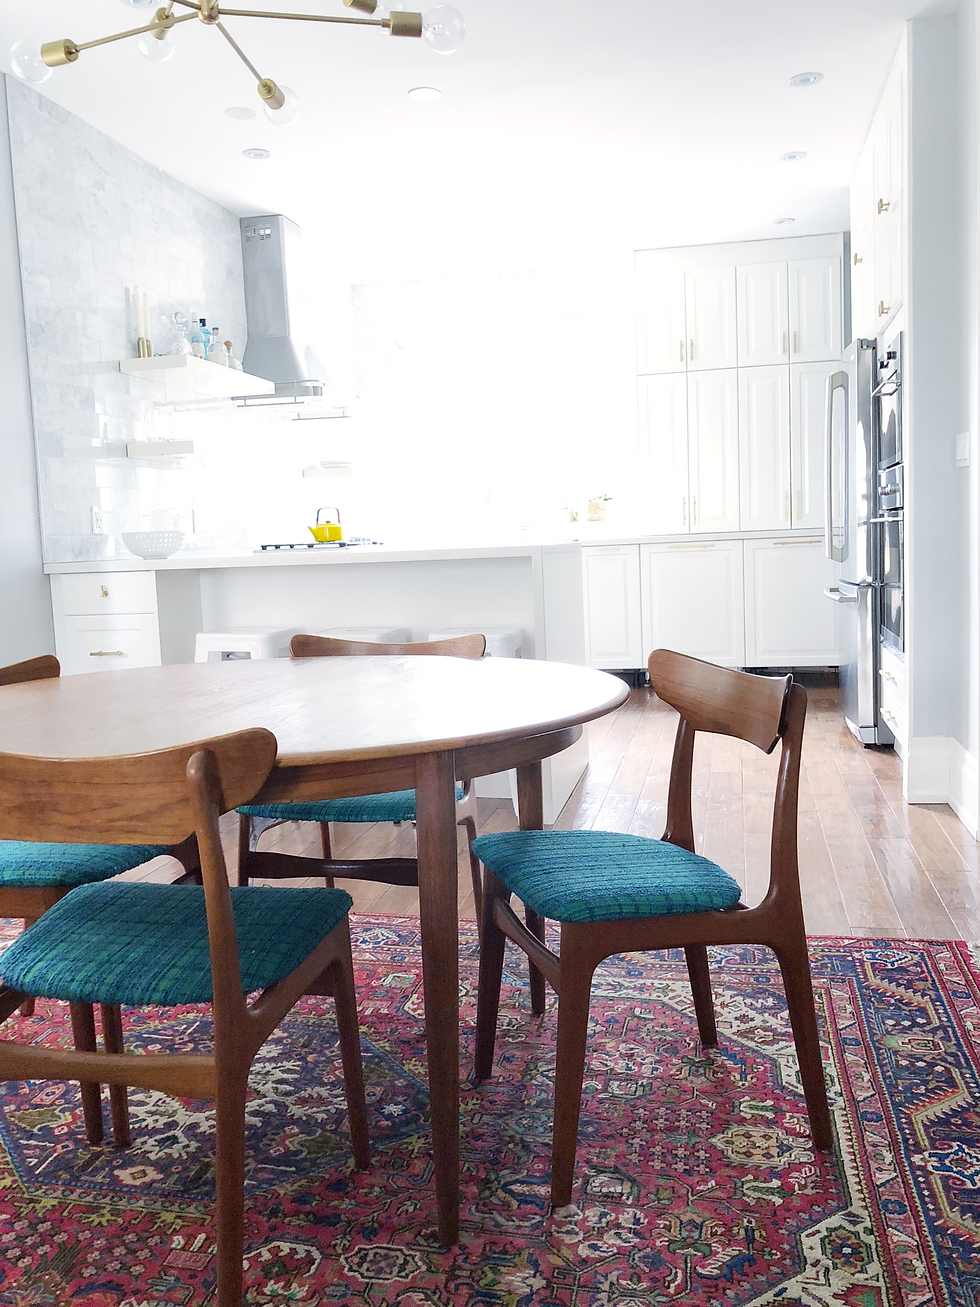
We've had this beautiful teak, mid-century dining set for over three years now. From the beginning, we were ambivalent about reupholstering the seats. On the one hand, the retro fabric adds a nice pop of teal. On the other, our primarily red rug in the dining area clashes with the seats. Though, there are some complimentary colors at play...
This past year, the seats started to become threadbare at the edges. And so, the decision was made for us!
When selecting the replacement material, I wanted something simple and contemporary to help the chairs blend in with our mostly Scandinavian and minimalist aesthetic. And, it definitely had to be sturdy and stain-resistant enough to survive a three-year-old and his spill-prone mom.
While I like things tidy, I'm actually a notoriously messy eater! (You probably wouldn't be able to tell who was sitting where if you compared my place setting to my son's after a meal)!
In the end, we decided on a creamy, off-white leather (to bring out the cream-coloured detailing in the rug). With this in mind, I had planned to scour the cluster of textile shops on King West for the perfect fabric. Luckily, my first stop, at King Textiles, proved fruitful.
They had a large selection of off-white leathers and a knowledgeable salesperson helped me determine the amount of fabric and foam cushioning needed for the job. He even gave me a quick tutorial with tips and tricks on how best to approach the project!
If you want to figure out how much fabric you'll need before you hit the shops, this site provides a good guide.

Here's the run down on how we, as newbie re-upholsterers, redid our mid-century modern dining chairs in leather:
1. Watch a YouTube video on how to reupholster seats with leather. How did people get anything done before Google and YouTube?
2. Detach the seat from from the chair. Lucky for us, this was as simple as using a flathead screwdriver to remove four screws. The seat popped right off.


3. Remove the existing upholstery with a combination of staple removers, pliers, scissors, and cursing!!! Putting on my doctor hat, I'd advise you to make sure your tetanus shot is up to date before embarking on something like this--I defy you to remove hundreds of furniture staples without a sustaining a flesh wound! This was the most arduous part of the entire process.


Got to give credit to my handy husband, Eric, for taking over after watching me struggle through the first two seats. (He has a
bit of an anal streak, and I could tell the little bits of fabric and broken-off staples I'd left behind were getting to him)...
If you want to see more of his handy work, check out this post on our IKEA kitchen reno!
4. Remove the foam padding from the base of the seat. In our case, this was easy to do, as only a thin string of glue held the two pieces together.

5. Trace the shape of the seat base onto the new foam cushioning, and cut the foam. We replaced the existing worn-thin foam with brand new, high-density foam. As I sit on the finished product, my bottom really appreciates the difference!

6. For the fabric, measure the chair in its longest and widest dimensions and add three inches to each side. For our 15" x 18" seats, I cut the fabric into 21" x 24" pieces. Even when cushioned, these seats are flatter than most and this ended up being overkill; we probably could have managed adding just two inches to each side.

7. With a hot glue gun, affix the new foam cushion to the chair base.


8. Center the seat, cushion-side down, on the fabric and use a staple gun (or pneumatic stapler if you're lucky enough to have access to one) to fasten the fabric to one end of the chair with a few staples. Do the same to the opposite end, making sure to pull the fabric taut.
Check to make sure you're happy with it before repeating the process with the other sides (you can use a staple remover to make corrections). Then add more staples, circumferentially, sparing about 1-2 inches at the corners.

As for how to scrunch the corners, I'll confess: I got so caught up in these next steps and my hands were too full to take all of the requisite photos. (This is something you'll probably want to watch on YouTube before attempting, anyhow). Again, props to my husband for helping with (i.e. taking over) this step after witnessing my not-so-handy work. There may have even been some staple removal and re-stapling involved...When will he learn it's less work to just do it for me???

9. Cut away the excess fabric with an exacto knife.

10. Re-screw the seats to the base of the chair.

Presto-chango! Some bloody and blistered hands later: you have a reupholstered mid-century modern chair!

Love the look of mid-century but not interested in the refurb? Check out these gorgeous MCM-style chairs on Amazon, already upholstered in modern fabric:

Looking for something lower maintenance? You can get set of four of these wood and plastic Eames-style chairs for only $99 on Amazon!

You May Also Be Interested In:


What do you think of the after? I miss the retro teal, but I think the new seats fit in a little better with the rest of our decor. Here's hoping they survive our next spaghetti dinner!
To be notified the second I have a new post, please subscribe!
If you liked this, I would LOVE it if you would like/share/pin/tweet by clicking on one of the icons right below!
ayamtoto | ayamtoto | ayamtoto | ayamtoto | ayamtoto | ayamtoto | ayamtoto | ayamtoto | ayamtoto | ayamtoto | ayamtoto | ayamtoto | ayamtoto | ayamtoto | ayamtoto |
toto slot | toto slot | toto slot | toto slot | toto slot | toto slot | toto slot | toto slot | toto slot | toto slot | toto slot | toto slot | toto slot | toto slot | toto slot | toto slot | toto slot | toto slot |
toto togel | toto togel | toto togel | toto togel | toto togel | toto togel | toto togel | toto togel | toto togel | toto togel | toto togel | toto togel | toto togel | toto togel | toto togel
ayamtoto | ayamtoto | ayamtoto | ayamtoto | ayamtoto | ayamtoto | ayamtoto | ayamtoto | ayamtoto | ayamtoto | ayamtoto | ayamtoto | ayamtoto | ayamtoto |
toto slot | toto slot | toto slot | toto slot | toto slot | toto slot | toto slot | toto slot | toto slot | toto slot | toto slot | toto slot | toto…
Discover your ideal sofa set at Abhi and Oak. Our collection is curated to bring both stunning design and lasting comfort into your home. Each sofa set is thoughtfully crafted to be the perfect centerpiece for your living space, offering a blend of modern aesthetics and durable quality. Find the set that complements your style and creates the perfect spot for relaxation and gathering. Explore the full range of options today.
Along with watches, Rick chats with the link TGN boys about some of his wild cars, almost losing Clive Cussler's watch, and how he came to own Jacques Cousteau's own Doxa. After that, stay in the link mix for a set of final notes that sticks link closely to the diving and car themes brought up in this episode. Thanks so much for listening and to G-Shock for supporting this episode. Just press play!
That's right, it's exactly what you're expecting: A Mission to Neptune MoonSwatch with a simple, bare, golden hand. That means, link no strawberries, Swiss emblems, or floral designs. Given that fact, I actually think this looks rather good with the jolt of contrast from the Moonshine. As is tradition, this watch will come with a certificate attesting that it link was created link under the full Moon of August 1.
Though the auction house has only link provided a single photo go the watch, you can get a decent idea of the condition that it's in, which is very good. Everything on its dial seems to check out, and would appear to be near spotless, save for what might be a blemish near the nine o'clock marker. The case looks to be rather sharp, as well, though I'd suggest asking for additional photos, as link there's no harm in confirming the true condition of the watch before committing link to a purchase.