


- Jun 15, 2018
- 7 min read
...How to Convert A Small Bedroom Into A DIY Walk-In Closet On A Budget

This post contains affiliate links. See disclosure.
When you hear the words 'walk-in closet,' what comes to mind? A massive room lined with built-ins containing a luxurious chaise lounge in the centre?
If you live in small home and/or have a limited budget, you may think a walk-in closet is out of reach. Not so! In this post, I'll show you how we transformed a small bedroom in our little home into a simple, DIY walk-in closet on a budget and the must-have organization tools we use to keep it tidy.
Ironically, since I've started blogging about decluttering, our place has never been a bigger mess. Time previously allocated to doing laundry and putting away dishes has been encroached upon by blog post writing and photo taking for said posts.
This week, I decided our walk-in closet was in bad need of a purge. My son's three-and-a-half, so I’ve finally accepted that I'm not going to fit back into my tight-fitting pre-pregnancy clothes while they're still 'in style,' if ever...
I also decided that this was the year to get rid of the half-dozen bridesmaids dresses I've accumulated over the years. Like sartorial keepsakes that I was never planning to wear again, they've been taking up precious real estate in our closet. No matter what anyone (usually the bride) tells you: no one ever wears a bridesmaid’s dress again after the wedding!

The purge...I took a Marie Kondo-style approach and piled everything out in the hallway (and into our adjacent bedroom), then went through and hand-picked what made it back into the closet. Yes, that's my high school kilt in the lower left corner. I'm keeping that forever, of course! But, about 3/4 of what you see here didn't make it back into the closet.
How would I ever have the time to purge my closet and meet my weekly post deadline? By blogging about the walk-in closet, of course!
In this post, I'll show you the closet organization tools we used to convert a tiny, awkward bedroom into a DIY walk-in closet!


First, a little background. We live in a small, century-old, Toronto semi. It has three storeys and five bedrooms but only 1200 square feet (if you don't count the unfinished basement). Needless to say, the bedrooms are teeny-tiny.
The two tiniest bedrooms are on the third floor. It was our plan to one day remodel this floor into a single, loft-style master suite. But, with many other areas needing more immediate attention, that reno is way on the back burner. In fact, it may not even be on the stove.
For now, the larger of the two pint-sized rooms on the third floor is our "master" bedroom (and I use quotation marks because my son's room, on the second floor, is larger); we've converted the smaller one into our makeshift walk-in closet.
We wanted a functional and inexpensive way of storing our clothes, knowing this would be a temporary set up.
Ironically, our DIY walk-in closet has become one of my favourite rooms in the house, and gets about as many compliments as our kitchen. After seven years of living here, I'm still in no rush to renovate the third floor!
A How-to / DIY Without Any Before Pictures?
Back when we first moved into our house, people were still taking photos with actual cameras (gasp! i know). Phone cameras just didn't cut it back then. This meant that unless we made a conscious effort to retrieve the camera in the moment, pictures didn't get taken. Alas, I couldn't dig up a single shot of this room before it was converted into a walk-in closet. I feel like just having to explain this dates me and it feels like I'm apologizing for this in almost every post! (I promise to take all of the requisite 'befores' for our next reno. And, you're in luck: our mudroom foundation is crumbling, so it'll probably be sometime in the next year!)
When planning out our walk-in, we knew we needed to store our clothes, both hanging and folded.
We decided to go with a customizable hanging wall unit, two dressers, and a heavy-duty garment rack on wheels (for the awkward, narrow, sloped-ceiling part of the room that seems to be meant for a queen-sized bed). And, of course, the advantage of using a bedroom as a walk-in closet is that it came equipped with its own bedroom closet, which we had at our disposal.
In this post, I'll show you the closet organization tools we used to create and organize our DIY walk-in closet on a budget.
1. A Customizable Hanging Wall Unit
My husband, Eric, installed our closet organizer system without any difficulty, and in under an hour. He's admittedly handier than the average husband! You may remember he did most of the work on my DIY chair reupholstery. (Between that and consulting on my Father's Day Gadget Gift Guide, he's getting drawn deeper into the blog vortex).
These exposed metal racks may be a bit Spartan for some tastes, but I like the sort of industrial vibe they give this room. We used to live in a converted factory loft, and I miss our previously industrial decor. This closet feels like a throwback to those days!
Our wall unit is customizable by length, width and conformation.
This is the configuration we chose:

The top rack houses my infrequently worn shoes (stilettos and six-inch platforms).
The top rod goes the full length of the unit and the majority of my tops live here (weekday/work clothes on the left and weekend/evening attire on the right).
I'm striving towards a capsule-type wardrobe of classic pieces and basics with allowance for a few new 'trendy' pieces each season.
We chose to extend the bottom rod to only half the length of the unit. My skirts go here, and I don't have all that many. The other half of this bottom area is for shoes. (Granted, the half-dozen shoes I wear the most are in the mudroom and front entry).

There are also some shoes hiding in the IKEA NORDLI drawers on the right.

Belts and scarves are displayed on hanging closet organizer racks on the left end of the wall unit.

Shop these ideas:


Rubbermaid Configurations Deluxe Custom Closet Organizer System Kit - customizable 4-to-8-feet long ($89.98).
Not up to drilling holes in the wall? Consider this free-standing, expandable option:


2. A Heavy-Duty Garment Rack
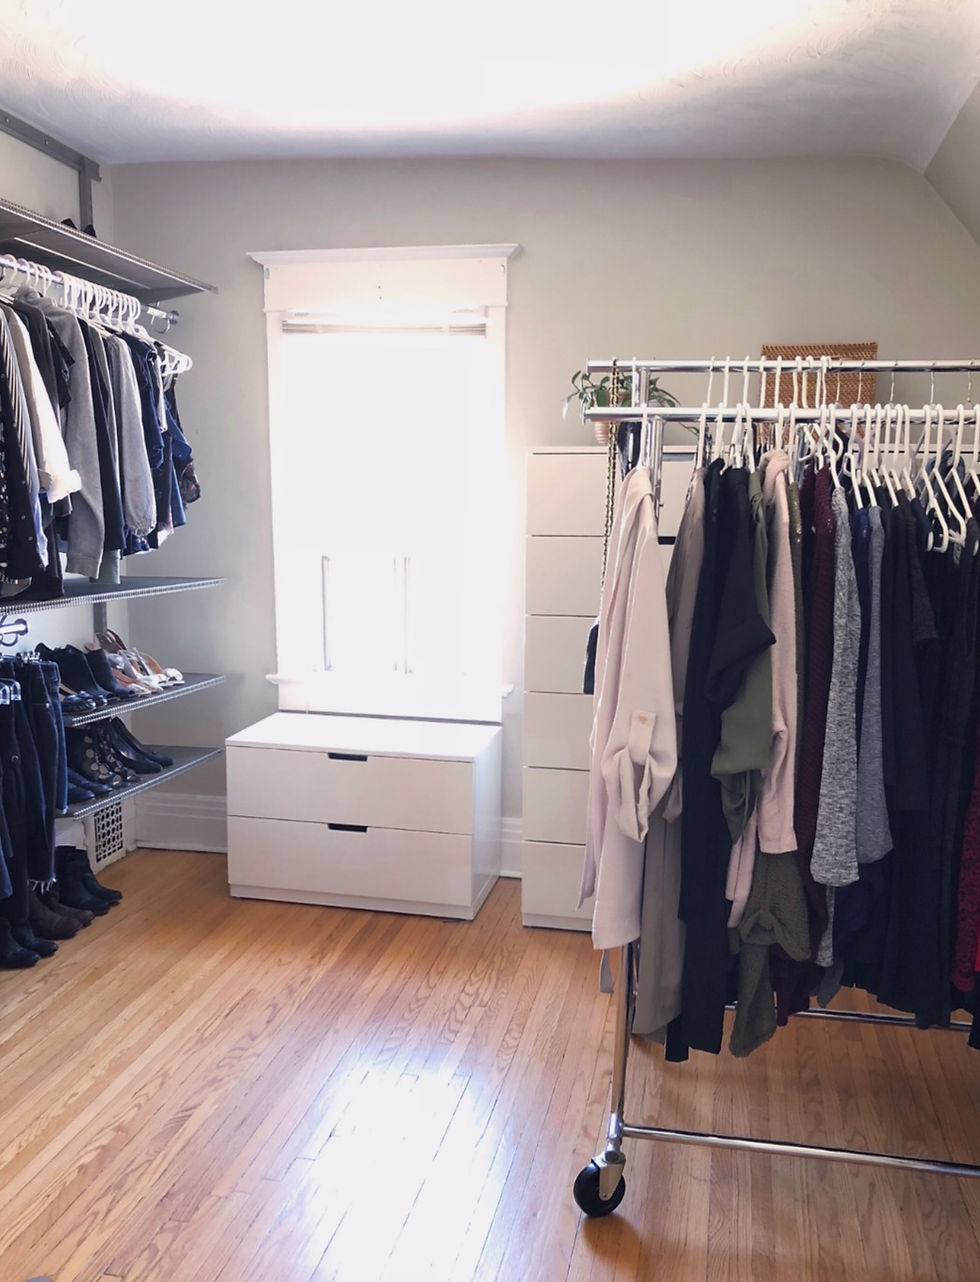
It's important to opt for a heavy-duty (i.e. all-metal) garment rack if you're planning for it to be a permanent fixture in your closet. We previously had a cheaper unit with plastic joints that literally folded under the pressure.
I keep my dresses and longer blazers on this rack, since there's plenty of height.
Our rack is on wheels, so I can pull it out of the little nook in which it's parked and into the centre of the room, if I want to get a better look at things in the back.
Shop this idea:

You May Also Enjoy:

3. Dressers
My husband and I each use one IKEA NORDLI dresser for our undergarments, socks, PJs, sweats, and a junk drawer. I find having a junk drawer (or two) in each room really helps to keep things looking tidy. Will post soon on junk drawer organization and my multiple junk drawer philosophy.
In case you're wondering what it looks like inside: on a good day, our clothing is folded and 'stands on end,' Konmari-style. It's just easier to see your clothes when they're arranged this way instead of stacked on top of each other. Though, admittedly, I take a haphazard approach to folding and our clothes look more like loose rolls than tight, uniform squares.
Shop this idea:

Angel Line Lauren 5 Drawer Chest ($199.98).

Gravalo Dresser With 8 Drawers ($345).
For some reason, putting my actual underwear on the internet doesn't seem like a good idea. But, my undergarments are organized in these handy drawer organizers:

4. Make the Most of the Bedroom Closet
This probably goes without saying. But, it's worth mentioning a couple of the organizational tools we use to capitalize on this closet within a closet.
Also, you may be wondering where my husband's clothes are. Well, they're in here! He has a lot less clothes than I do. So, between this closet and his dresser, he's covered.
(Of note, our off-season clothes are in the master bedroom closet. In the summer, it's full of flannel and sweaters. In the winter, shorts and swimwear live there).
Eric has an over-the-door shoe organizer for accessories like hats, sunglasses, and belts. If you've been following along for a while, you may have noticed this is the third time I've featured this versatile organization tool on the blog. I've covered how to use one as a vertical garden and to organize things in your kid's room. No closet space is maximized without one!
He also has a hanging tie organizer in the closet proper.
Shop these ideas:

A clear organizer may be more useful for storing smaller items that sit below the pocket's edge:


mDesign Closet Hanging Tie Organizer ($9.99).
5. A Dressing Table
This isn't essential to a walk-in closet. But, since our bathroom is lacking in space and storage (another future reno!), having a vanity in here is such a lifesaver. I keep all of my makeup and hair care items in the drawers. It can even double as a workspace in a pinch!
You might recall that on the weekdays, I use a capsule makeup kit to get ready in the first floor powder room, so that I can keep an eye on my three-year-old while he eats breakfast in the kitchen. The weekend, however, is another story. I love having the luxury of sitting down in front of a big mirror and taking my time!

I have the IKEA MALM dressing table. It has a luxuriously long
drawer that is perfect for storing makeup in flat organizers.

There are more cosmetics, as well as my hair and nail stuff, in these handy, stackable drawers that fit perfectly beneath the MALM:


Shop these ideas:

Convenience Concepts Console Table ($59.63).


IRIS Stacking Drawers - set of 4 ($39.99).


STORi 2-Tiered Nail Polish Organizer ($9.99).

There you have it! Our DIY walk-in closet and how we keep it organized!
What are your closet organization must-haves? Let me know in the comments below!
To be notified each time I publish a post (usually each Friday barring natural or domestic disaster), please click subscribe!
If you enjoyed this, I'd really appreciate if you would click to like/share/pin/tweet right below!
Great transformation! Turning a small bedroom into a functional walk in closet on a budget is such a smart idea. I especially liked the focus on keeping only the items you actually wear and using practical storage solutions. For men, having an organized space makes it much easier to store wardrobe staples like a Marco Enzolani leather jacket for men, keeping it in great condition and easy to access year round. Thanks for sharing these helpful organization tips!
Getting your home interiors done in Bangalore can be tough. What are some of the biggest challenges you've faced? We've compiled a list of the best interior designers in Bangalore to help simplify the process. Take a look!
Men pin up uzbekistan haqida ko‘p eshitganman va o‘zim ham sinab ko‘rdim. Umuman olganda, o‘zbek tilidagi interfeysi va so‘mda to‘lov imkoniyatlari juda qulay. Bonuslar ham yaxshi, ayniqsa yangi boshlovchilar uchun. O‘yinlar xilma-xilligi juda katta, slotlardan tortib jonli kazino o‘yinlargacha bor. Foydalanuvchi yordami ham tez va samimiy javob beradi. Shuning uchun bu yerda o‘ynash yaxshi tajriba bo‘lishi mumkin, ayniqsa 2025-yil uchun zamonaviy va ishonchli platforma.
Quick Take: I'll admit I thought this Sylvain Pinaud had a small chance at taking away the link Men's Prize, but I should have never doubted the brilliance of Rexhep Rexhepi and his team. That said, it was link still fantastic to see it end up with some sort of recognition. The Origine is already a quiet link hit among indie lovers and is set to make Sylvain Pinaud a star.
For more on clocks as link heat engines, check out our Visit To The Atmos Workshop At link Jaeger-LeCoultre. And for an in-depth technical analysis, history, and a look at a heat-driven clock running today which has not been manually wound since 1864, have a look at link Secrets Of The Atmos Clock.